
This post contains affiliate links.

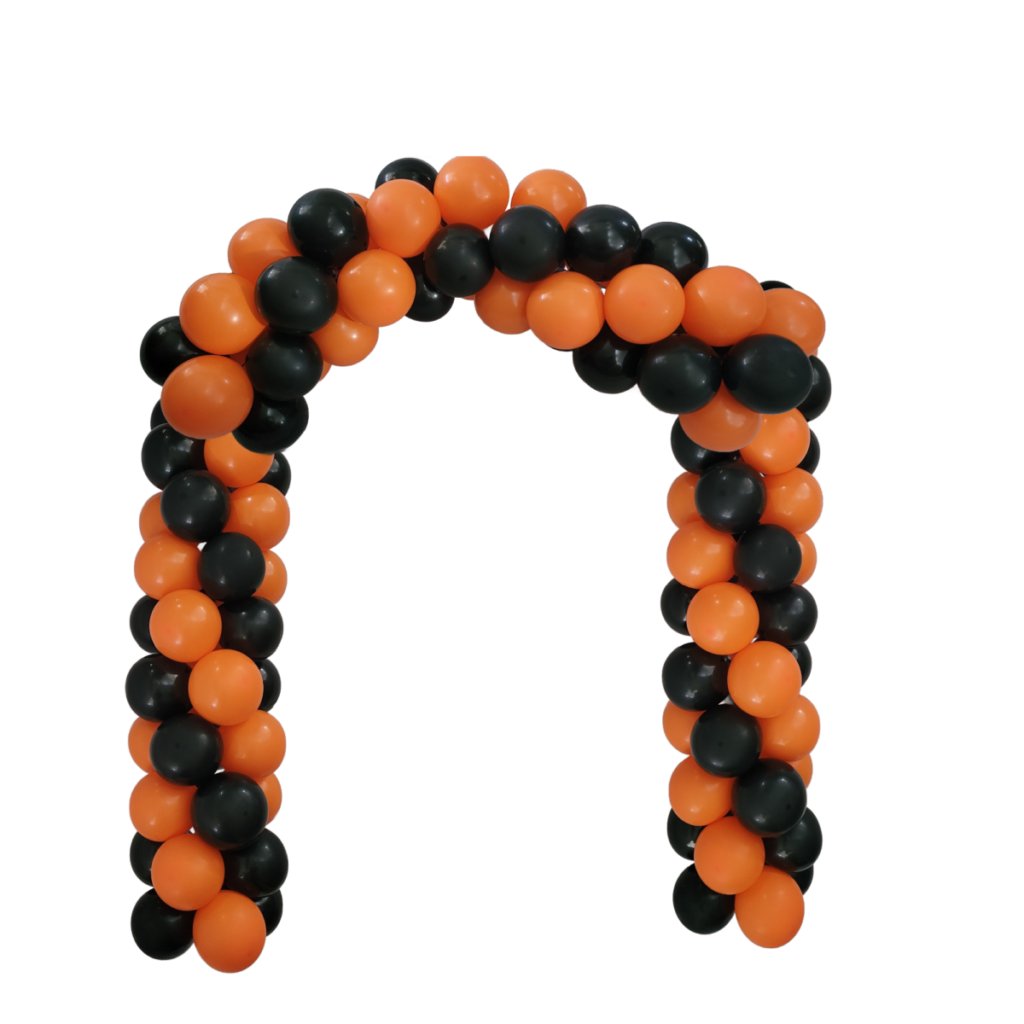
Are you ready to take your balloon decorations to the next level? Imagine seeing a visually stunning balloon arch standing proudly at your next event. But wait, you don’t have a stand? No problem! This article will unlock the secrets of creating a simple balloon arch without relying on a stand.
To make a simple balloon arch without a stand, start with two weights, such as balloons filled with sand or water. Next, inflate balloons to uniform sizes, tying them together in duplets, quads, or clusters. Fasten some fishing line to one of the balloon weights, then attach the quads individually until it starts forming an arch-like arrangement. Adjust the balloon placement until achieving the desired aesthetic, ensuring the structure remains stable. Secure the final balloon weight and adjust when all balloons are attached.
Get ready to unleash your creativity and amaze your guests with this jaw-dropping balloon arch. From gathering your supplies to adding the finishing touches, we’ll guide you through each step, ensuring that your balloon arch becomes the highlight of any occasion. So why wait? Let’s dive in and learn how to make a balloon arch that will leave everyone in awe. Get ready to become a balloon master!
What Is A Balloon Arch
A balloon arch is a decorative arrangement comprised of inflated balloons arranged to form an arch. It is a stunning focal point, adding a touch of whimsy and festivity to any occasion. Whether you’re hosting a birthday party, wedding reception, or corporate event, a balloon arch can transform the atmosphere and create a memorable experience for your guests.
Traditionally, balloon arches are constructed using a stand or a frame that holds the balloons in place. However, this section will explore an alternative method to create a beautiful balloon arch without relying on a stand. Following a few simple steps, you can bring your creativity to life and amaze your guests with a jaw-dropping balloon arch that stands out.
From gathering the necessary supplies to adding the finishing touches, we will walk you through each step of the process. With clear instructions and helpful tips, you can create a stunning balloon arch that will leave everyone in awe. So, if you’re ready to become a balloon master and take your decorations to the next level, let’s dive into the steps for making a simple balloon arch without a stand.
Steps To Make A Simple Balloon Arch Without A Stand
What You Will Need:
- Balloons (the number of balloons you need will depend on the size arch you are making)
- Balloon hand pump or balloon inflator (you can find my favorite hand pump on Amazon here)
- Balloon sizer (optional)
- Balloon weights
- Fishing line, curling ribbon, or nylon string
- Scissors
Opt for high-quality balloons that are less likely to pop or deflate quickly. Consider your event or celebration’s color scheme and theme to guide your balloon selection. Bright and vibrant colors work well for birthdays and festive occasions, while pastel or muted tones can be perfect for elegant events.
Do NOT Inflate Balloons With Your Mouth. Check out my post, Never Inflate A Balloon With Your Mouth – 5 Reasons.
Fishing line is an excellent option as it is virtually invisible, creating the illusion that your balloons are floating mid-air. Ensure you have enough length to span the desired width of your arch.
Inflate, Size, And Tie Into Duplets
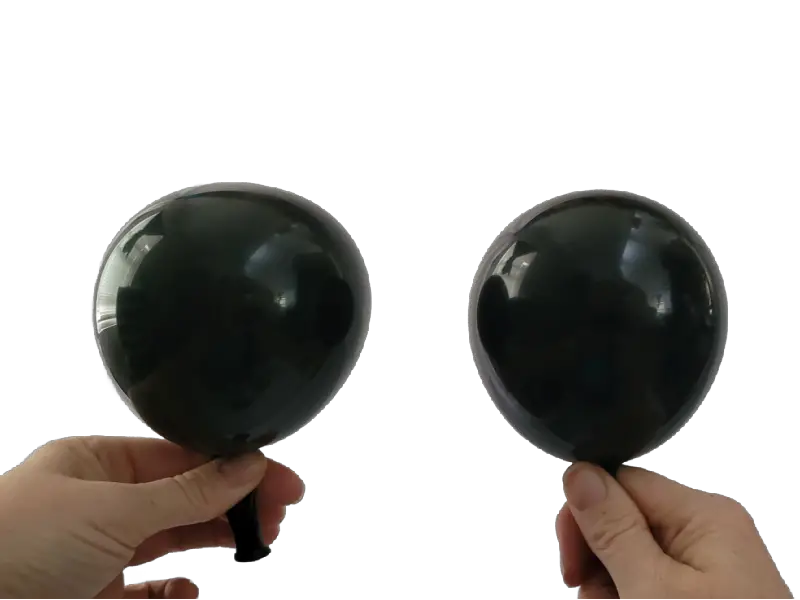
Inflate two balloons. Size your balloons to approximately the same size. Consistency is critical here, as evenly sized balloons create a visually appealing arch. Take your time to ensure each balloon is inflated to the same size, maintaining uniformity throughout.
For example, if I am using 11″ or 12″ balloons, I would size my balloons to between 7″ – 9″ depending on the final size of the balloon arch. Check out my post, Best Way To Size A Balloon – Balloon Sizer, if you need more information about how to size a balloon. Also, check out my post, How Many Balloons Do You Need For A Balloon Arch Or Balloon Garland, to determine precisely how many balloons and what size they should be for your particular arch.
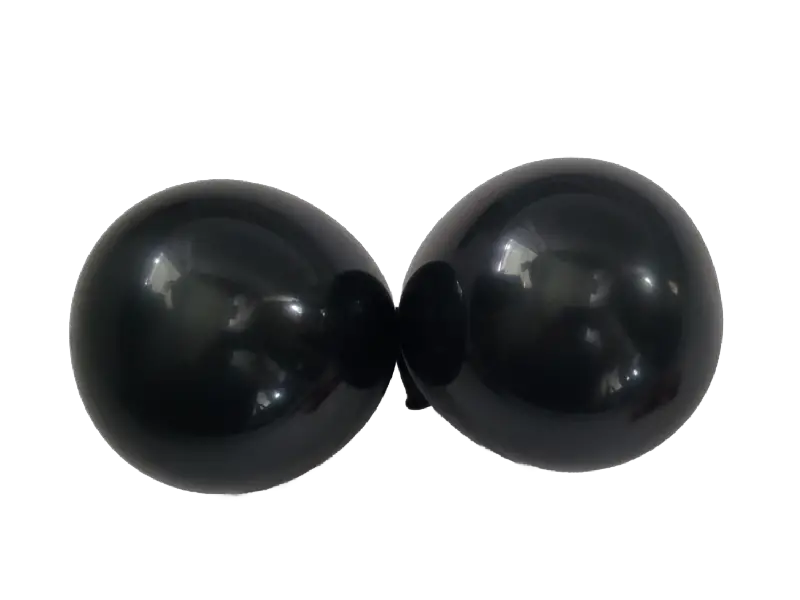
Then, tie the two inflated balloons into duplets. Take the two inflated balloons and tie their necks together with a knot. Ensure the balloons are tightly secured to avoid accidental popping or unraveling later. Repeat this process until all your balloons are tied into duplets.
If you need more information on making a duplet, check out my post, Tie Balloons Together – Making Balloon Duplets, Balloon Quads, And Balloon Clusters.
By inflating, sizing, and tying your balloons into duplets, you are setting the stage for a truly mesmerizing balloon arch. This method ensures that all your balloons are uniform in size and provides a sturdy foundation for the arch structure. With the correct technique and attention to detail, your balloon arch is well on its way to becoming a show-stopping focal point.
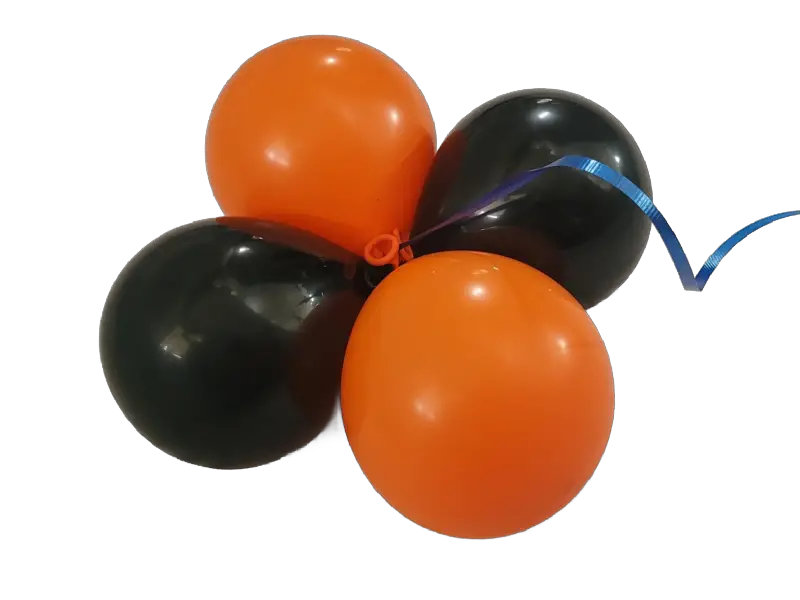
Twist Duplets Into Quads
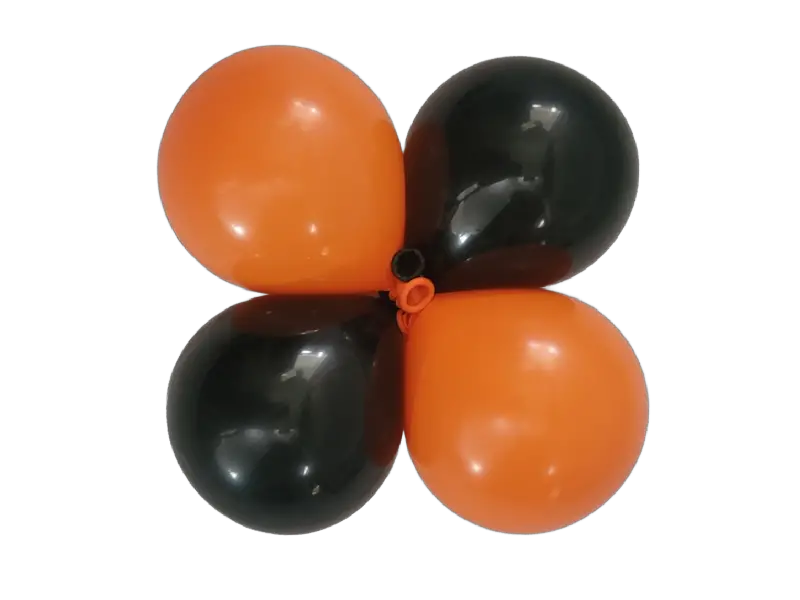
Twist the duplets into quads. To twist the duplets into quads, hold two duplets and twist them together in the middle. This will create a sturdy connection between the balloons, ensuring they stay in place once incorporated into the arch.
Repeat this process with additional duplets until you have enough quad units to build your desired arch size. If you need more instructions on making quads, check out my post, Tie Balloons Together – Making Balloon Duplets, Balloon Quads, And Balloon Clusters.
Attach First Weight
Now that you have learned how to twist duplets into quads, your balloon arch is ready for the next step: attaching weight. This crucial step will ensure your arch stays in place. This type of balloon arch is NOT intended for outdoor use or high-traffic areas.
When it comes to attaching weight to your balloon arch, there are a few options you can consider. One simple and effective method is using balloons filled with enough water to hold the weight of the balloon arch. These water balloons can be attached to the bottom of your arch, providing enough weight to keep it steady.
Another option for adding weight to your balloon arch is using sand inside a balloon. These can be placed at the base of your arch to provide stability.
Cut some fishing line, curling ribbon, or nylon string about twice as long as your finished balloon arch. Leaving some extra length at the end for tying and securing the line is a good idea.
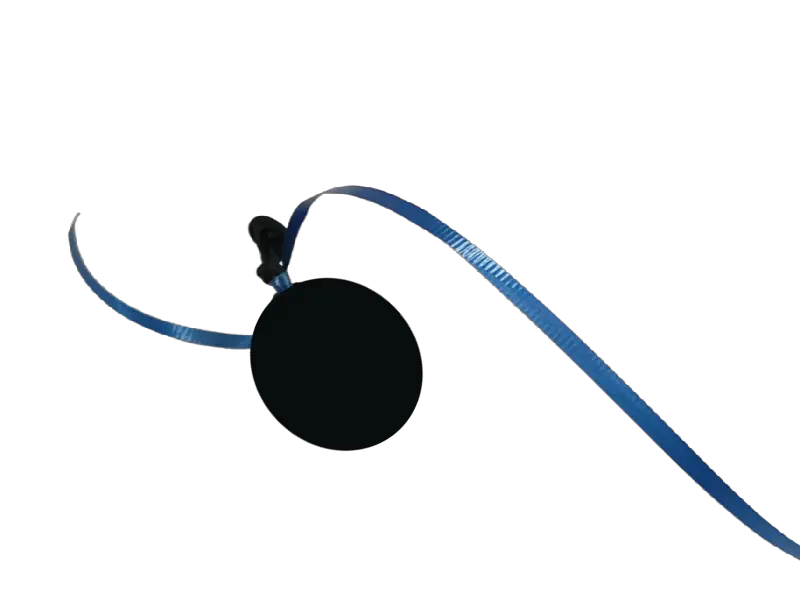
Place one of your balloon weights on the floor, and tie the end of your fishing line, curling ribbon, or nylon string to the balloon weight.
For this example, I purposely used a color that would stand out so you could see it, but I usually would use something to blend in so you can’t see it in the final arch.
If you need more information on balloon weights, check out my post, Balloon Weights: How To Use, Make, And How Heavy They Need To Be.
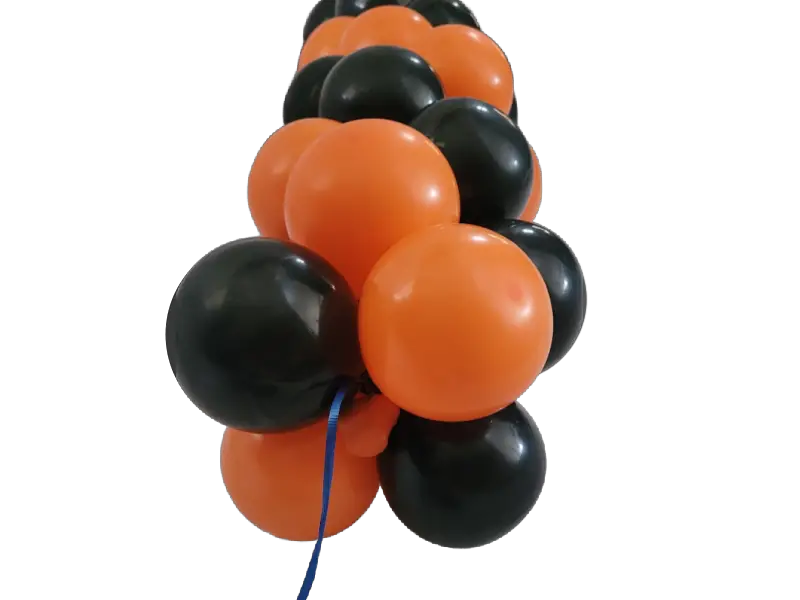
Wrap Quads With Fishing Line
Now that your line is securely weighted, the next step is to wrap your quads with the fishing line, curling ribbon, or nylon string. By tightly wrapping the fishing line around the quads, you create an additional layer of support that will keep the balloons exactly where you want them.
Set a quad on top of the balloon weight from the previous step. Begin wrapping the fishing line, curling ribbon, or nylon string around the balloon quad.

When you are ready, add the next balloon quad, creating a crisscross pattern so the balloons sit nestled in each other.
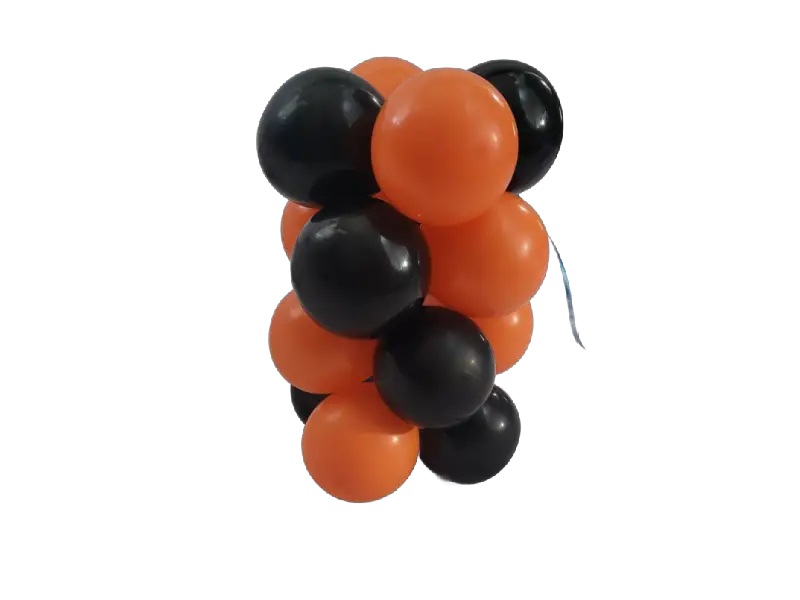
Continue adding balloon quads until you achieve the desired length for your arch. Leave some extra string at the end for tying the second balloon weight.
You create an invisible support system that keeps your balloon arch secure by wrapping your quads with some fishing line, curling ribbon, or nylon string. With the quads wrapped, you can move on to attaching a second weight, providing even more stability for your impressive balloon arch display.
Attach Second Weight
Attach the second balloon weight to the other end of the balloon arch. The purpose of the second weight is to anchor the opposite end of your arch, preventing it from tipping or swaying.
With the second weight attached, your balloon arch should have a strong foundation and be more movement-resistant. However, it’s always a good idea to lean this balloon arch against a wall so it doesn’t topple over.
Adjust As Needed
Finally, step back and assess your balloon arch. Adjust any balloons or the shape of the arch as needed.
Add Finishing Touches
With your balloon arch now securely adjusted, it’s time to add the finishing touches and take your creation to the next level. Like any other art, the beauty lies in the details. These final steps will ensure that your balloon arch stands out and adds that extra wow factor to your event.
First, consider incorporating some additional decorations that complement your overall theme. You can attach ribbons, streamers, or fairy lights to the arch for a whimsical touch, just nothing too heavy. Ensure you don’t use any lights that heat up, as they could cause your balloons to pop.
If you’re throwing a birthday party, why not add colorful paper cutouts of your child’s favorite cartoon characters or team mascots? The possibilities are endless, so get creative and have fun with it.
Next, think about the placement of your balloon arch. If it will be the focal point of a room, make sure it’s positioned strategically so that everyone can see and admire it. Place it near the entrance to create a grand entrance for your guests or as a backdrop for a photo booth. Experiment with different locations until you find the perfect spot for your arch to shine.
Enjoy!
It’s time to step back and admire your handiwork. Take a moment to appreciate your creativity and effort in creating a stunning balloon arch without a stand. Now, let the festivities begin, and watch as your guests are captivated by this eye-catching focal point.
Simple Balloon Arch Without A Stand Video (coming soon)
Constructing a visually stunning balloon arch without a stand is easier. Following this article’s simple steps, you can unleash your creativity and impress your guests with a jaw-dropping centerpiece. From gathering your supplies to adding the finishing touches, these expert tips and tricks will ensure your balloon arch becomes the highlight of any event. So why wait? Get started today and let your imagination soar.
“Art is not a thing; it is a way.”
Alan Fletcher
Embrace the art of balloon arch-making and create an unforgettable experience for everyone involved. Your guests will be amazed, and you’ll feel immense pride in your incredible creation. Remember, the only limit is your imagination. So grab those balloons, and let your creativity take flight. The sky’s the limit!
I hope this post brought value to your day. If it did, please consider sharing it with a friend or on your favorite social media. Thanks For Reading Fun With Balloons!